We say a
lot about...
everything


Popular Articles


MVVM with RxSwift
I'll show you how to use MVVM instead of MVC, Apple’s default architecture. We'll go through some of the problems I ran into while using MVVM with RxSwift and some solutions that made my life easier.
Published on May 5, 2018
by
Filed under development

In this article, I would like to show you a few things about the Model-View-ViewModel (MVVM) architecture with RxSwift.
We’ll cover a few concepts that made my life a whole lot easier, but also show you some problems that I ran into. When setting up a new iOS project, Xcode defaults to using the Model-View-Controller (MVC) architecture. Switching to MVVM has turned out to be a good choice for the projects I work on.
👉 If you are familiar with the concept of MVVM you can skip to the examples section below.
Comparison between MVC and MVVM
Before getting started with MVVM, I’ve used MVC as my default architecture. The easiest way to get started with MVVM was to compare it against MVC, so I think that might be a good way to familiarize ourselves with it.
Let’s consider the general idea and flow behind MVC.
The View handles some sort of user action by pinging the Controller.
The Controller is in charge of updating the Model with the data received from the View.
The Model handles any data changes and notifies the Controller.
The Controller updates the View.
The diagram below should make things a bit clearer.
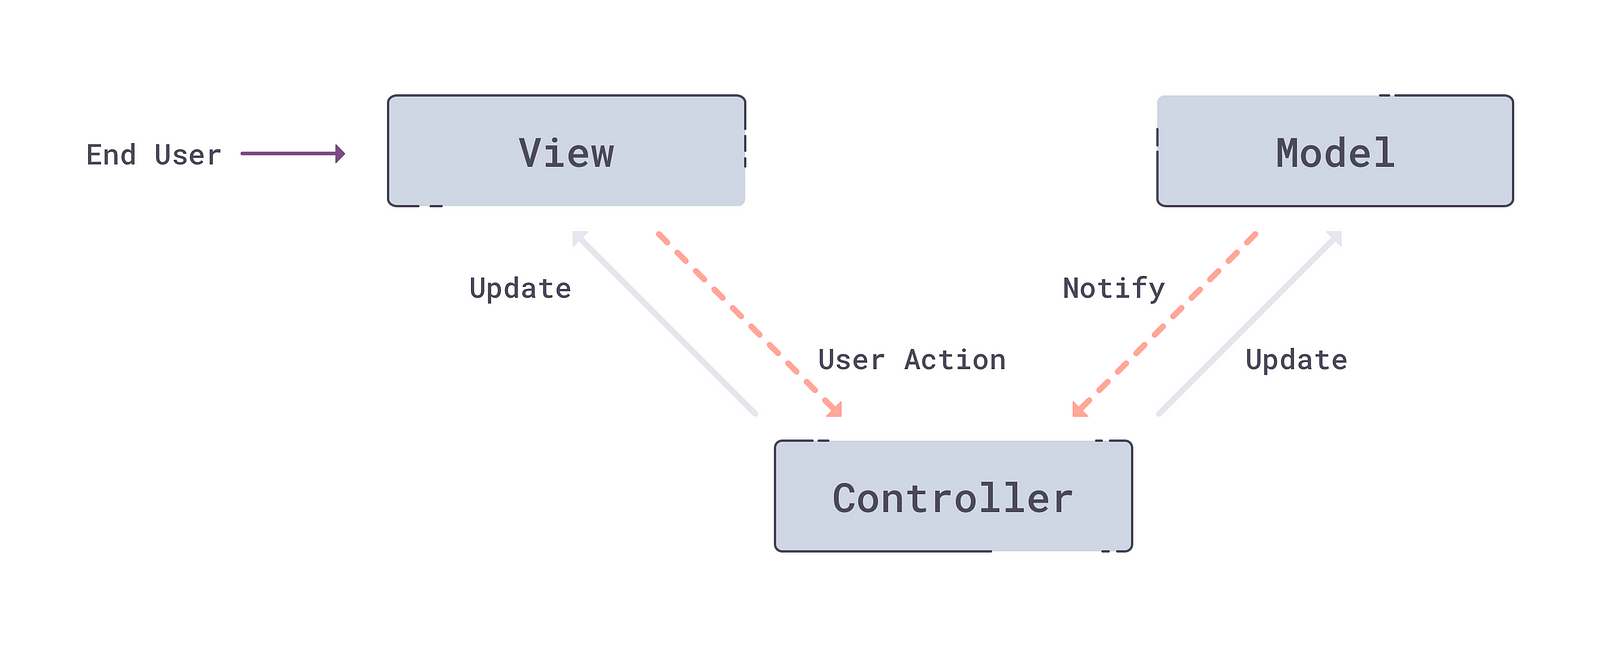
Model-View-Controller
In the case of web development, where you have a clear separation of these three layers, this sounds great! But when developing for iOS, things can get a little more messy.
It is easy enough for us to separate the Model and that stays the same for both MVC and MVVM.
It gets a little bit more complicated when we try to separate the View and Controller parts. If you have been using MVC in iOS you must have noticed that we are missing something. Where are our View and Controller layers? We have the ViewController that should act as a View, yet we still write a huge amount of business logic, data manipulation, networking and UI inside of that ViewController. Even for the most basic of screens, our ViewController can get pretty big, resulting in two things:
A huge amount of code that is very hard to maintain.
It is almost impossible to test anything in this mess because our presentation mixes with business logic.

Model-View-Controller (iOS)
What if we separate this mess into two distinct and separate layers, making the ViewController responsible only for the UI and some other layer responsible for the business logic. That is exactly what MVVM does. It introduces the ViewModel as a layer between the View and the Model.

Model-View-ViewModel
The responsibilities of the ViewModel are to update the Model and prepare the data for the View. A great thing with MVVM is that the ViewModel provides some kind of data binding for the View so it can update automatically on any data change. There are a few ways to implement data binding on the ViewModel: delegates, Key-Value Observing, Reactive Programming and some others.
My favorite approach is Reactive Programming using RxSwift. If you are new to the Rx world you might have some problems following along with the examples, so I recommend you come back here after you read more about it. Or you can continue reading and ignore the syntax, just try to get your head around the idea and how things work.
👉 Quick tip: The ViewModel should never have a reference neither to the View, or any UIView subclasses. As a rule of thumb: if you import UIKit you are doing something wrong.
🔨 Examples
The best way to make all this a bit clearer is to demonstrate it in a simple example. Some things we are going to cover:
how data binding works,
the convenience of flatMapLatest,
a few problems I stumbled upon.
Download the project so you can follow along. If you are unfamiliar with some of the libraries I used, just ignore them, they are not relevant to what I’m about to show.
⬇ Download the example project here.
Binding
👉 Make sure you are checked out in the master branch.
Once you start the app you are presented with a table populated with a list of developers. Selecting any of them sends you to the Developer screen. On this screen, we have a counter and a button that increases the counter. Pretty useless app, but that’s not the point. 😇
Open the DeveloperViewController, and the DeveloperViewModel files. We are going to bind the text presented in the label to correspond to data from the ViewModel. We are also going to bind the + button taps so we can increase the counter.
On lines 30 and 31 in the DeveloperViewController, we are creating an Observable that is going to emit an event every time the user taps the + button.
let increaseCounterTaps = increaseCounterButton.rx
    .tap
    .asObservable()

self.developerViewModel
    .setupIncreaseTaps(increaseCounterTaps: increaseCounterTaps)
In the DeveloperViewModel we are listening to these events, increasing the counter every time it happens, and binding those changes to the counter Driver. We are doing this so we can listen to these changes in the ViewController. This is the data binding we were talking about before.
func setupIncreaseTaps(increaseCounterTaps: Observable<Void>) {
    counter = increaseCounterTaps
        .do(onNext: { [weak self] a in
            self?.counterState += 1
        })
        .flatMap { [weak self] _ -> Observable<String> in
            guard let `self` = self else {
                return Observable.just("0")
            }
            return Observable.just("\(self.counterState)")
        }.asDriver(onErrorJustReturn: "0")
}

func setupObservables() {
    developerViewModel.counter
        .drive(self.counterLabel.rx.text)
        .disposed(by: disposeBag)
}
flatMapLatest
In this part, I’ll show you how the flatMapLatest operator works on the search example. For this part, I’ve built a DataService service that simulates fetching data from the remote server. As is often the case in the real world, every response from the server has some delay. To demonstrate this better, the delay is a bit bigger than your server response should usually be!
The idea here is that with every new letter typed in the search bar, we are asking the server for results for the corresponding term. At any given moment we want to present results for the last term inputted. So imagine you are searching for a developer named “John”. The last two searches are for “Joh” and “John”. If response for “Joh” comes after the response for “John”, we have to ignore it.
flatMapLatest is the ideal solution for our problem. The corresponding image is shown below and for code check the following files: HomeViewController, HomeViewModel, and DataService.

flatMapLatest
🤦 Problems
The last thing I want to touch upon are the most common problems that come up when using MVVM and RxSwift, and some of these have given me a lot of headaches. They can result in both bugs and crashes with your application.
Drivers
👉 Documentation for the Driver trait can be found here.
Use Driver when you are binding to the UI elements, it ensures you don’t touch UI from anywhere but the main thread and saves you from unnecessary crashes. It’s easy to change threads and even easier to forget about it and by using Drivers you don’t have to worry about going back to main thread before interacting with the UI.
You can find the example on the branch named no-driver-problem, just run it and try tapping on the + button in DeveloperViewController and see what happens.
Dispose Bag
Dispose Bag is there for you so you don’t have to worry about disposing subscriptions. Usually, this is done when the ViewController is removed from memory. But sometimes that is not the right time to dispose and the best example for that are the cells in the table view.
If you are adding disposables from a cell into tableView’s disposeBag, when the user starts to scroll and cells start to reuse, you are going to end up with multiple outdated subscriptions. This usually results in multiple calls to the method in charge of handling cell selection.
Example for using the wrong DisposeBag is on the wrong-dispose-bag branch, in the setupTableView method of the HomeViewController. Try scrolling the table on HomeViewController to get some cells reused, and keep an eye on the lines that get printed out.
Variables and PublishSubjects
When I first started using RxSwift everything seemed like it should be a Variable. That is because they bring mutability to the immutable world, but in most cases that is not good and they can be changed with some Observable. Use them with caution.
Retain cycle
I left this one for the end. I love it as much as I hate it. As we said before, dispose is called on deinit. But what if deinit doesn’t happen? This is a general problem with closures in Swift, but this example demonstrates it in the context of Rx.
Let’s start from the top to understand the problem. The ViewController has a reference to the DisposeBag.

VC -> DB
By adding Disposable to the DisposeBag we are giving a DB reference to the Disposable.

VC > DB > Disposable
The Observable lives within Disposable so Disposable has a reference to it.

If we use self inside Observable we are giving the Observable a strong reference to the VC and that results in the following retain cycle.

There are a few solutions to this problem, and they are all based on breaking the strong reference from Observable to VC.
We can pass variables we are going to use to the capture list. I don’t like this one because it can get messy when using more than one variable.
We can use unowned self but the problem here is if something goes wrong it results in crash.
❤ My favorite one is making self
weakand providing what happens if self is nil, like you can see in thesetupIncreaseTapsfunction. Bulletproof!
This was my insight on MVVM with RxSwift, feel free to clap, share and comment. Thank you for your time, looking forward for any constructive criticism 🙂.
Related Articles
Join our newsletter
Like what you see? Why not put a ring on it. Or at least your name and e-mail.
Have a project on the horizon?